
Ubisoft’s Skull and Bones is making waves in its latest closed beta as a new pirate game, and despite facing delays since its 2017 launch, it’s officially announced to be released in February 2024. This visually stunning game features impressive rendering, dynamic weather, and realistic set design, immersing players in the golden days of pirates as they battle others and harvest resources. The character designs and graphics are excellent and enhance the overall experience.
So, Pirate RPG fans, hurry up and get ready to enjoy this game. However, before that, understanding how to change servers is crucial if you’re looking to enhance your gaming experience. This comprehensive guide will walk you through the process, ensuring you can smoothly navigate Skull and Bones on your preferred server.

- ✅ Reduce Lag and High Ping.
- ✅ Boost FPS at the Same Time.
- ✅ Support 8000+ Popular Games.
- ✅ Change Server Easily with Low-Ping.
- ✅ End Connection & Crashing Issues.
The Benefits of Changing Server Skull and Bone
Do you know that changing servers can enhance your gaming journey? Here are some compelling benefits that might just convince you to explore a new server in Skull and Bones.
1. Reduced Latency for Seamless Gameplay
Shifting to a server closer to your geographical location can significantly reduce latency, providing a smoother and more responsive gaming experience that can allow gamers to enjoy a faster response time, quicker ship movements, and an overall enhanced gameplay flow.
2. Access to Exclusive Events and Content
Different Skull and Bones servers often host unique events and offer exclusive content, therefore, by changing servers, you open the door to special in-game activities, quests, and rewards that may not be available on your current server.
3. Diverse Player Interactions
Every server has its dynamic player community, therefore, changing servers introduces you to a diverse player base, offering fresh interactions, alliances, and rivalries.
4. Optimized Connection Stability
Some servers may experience occasional instability or high traffic, leading to connection issues, therefore, changing to a less crowded or more stable server can minimize disruptions, ensuring a consistent and reliable gaming experience without sudden disconnects or lag spikes.
Hot Read: Skull and Bones Packet Loss: Causes & Solutions >
How To Change Server in Skull and Bones without lag
Utilize LagoFast to Automatically Change Your Server in Skull and Bones
Primarily, we recommend gamers use Gaming VPN LagoFast to change servers in Skull and Bones. With its real-optimization feature, LagoFast can quickly and automatically change into a smoother server if it finds the current route is unstable. Compared with other methods, for example, players change servers in-game, changing servers in Skull and Bones can prevent high-ping issues. Moreover, LagoFast also has other features like boosting FPS, that assist gamers to solve various issues that they may encounter in Skull and Bones. Now, LagoFast has server networks that more than 60 countries and 150 cities, which means, no matter where you are, you can launch LagoFast to start immersive gameplay.
Follow this tutorial to change server in Skull and Bones:
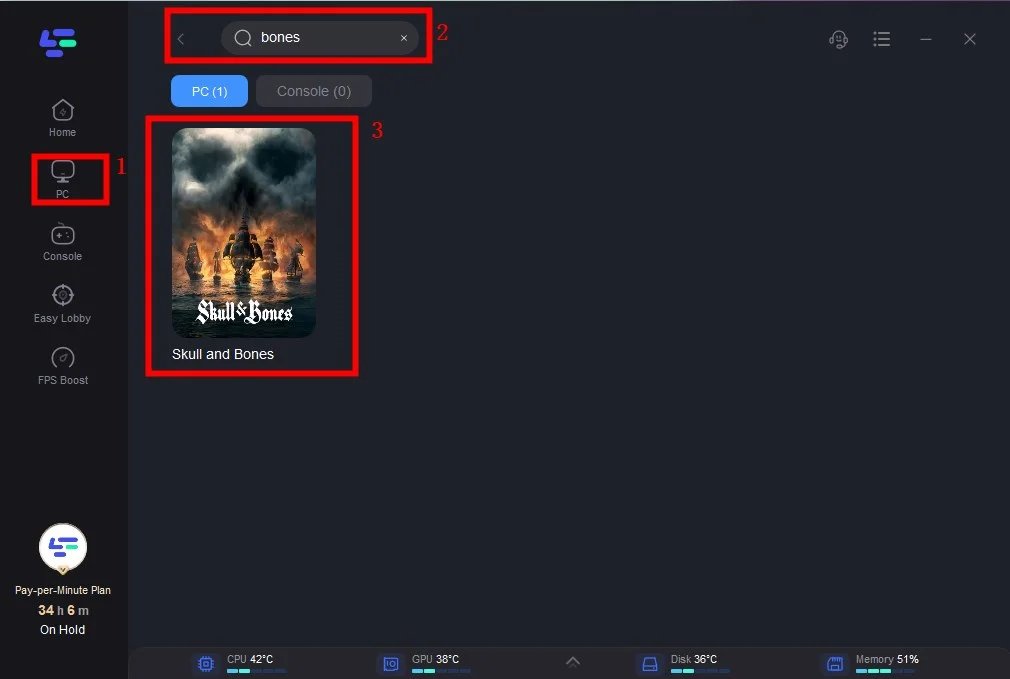
Step 1. Free Trial Download.
Step 2. Before you launch Skull and Bones, you can search for it in LagoFast. You can first select the “Game Boost button” and then search it in the search bar.
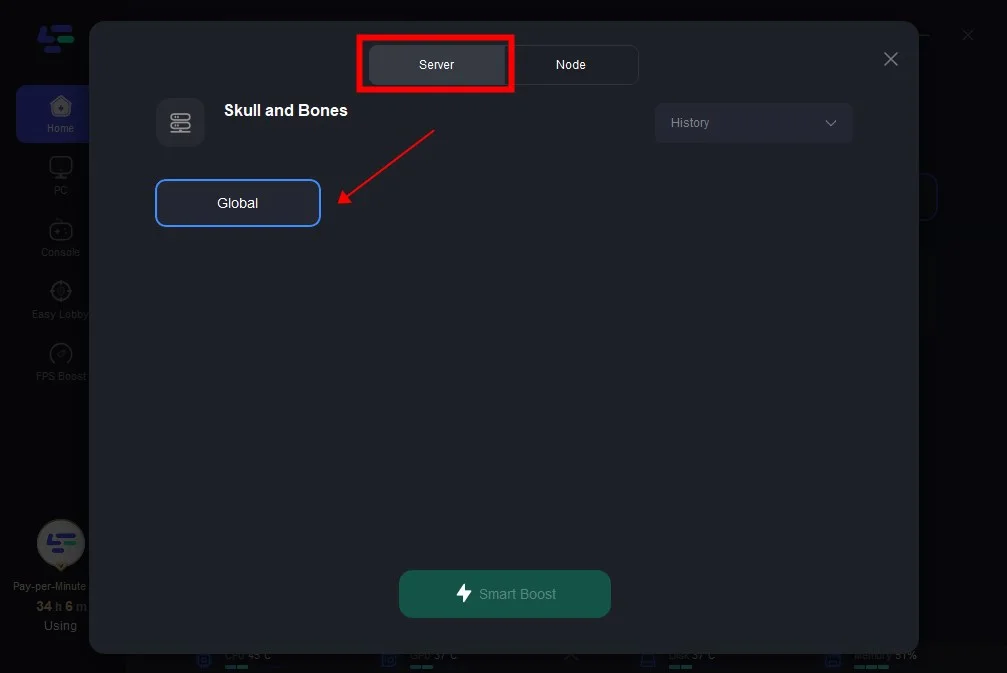
Step 3. Click on “Select Server” so you can choose the servers you want, then click on the “Node” on the right, you can also choose the best Node.
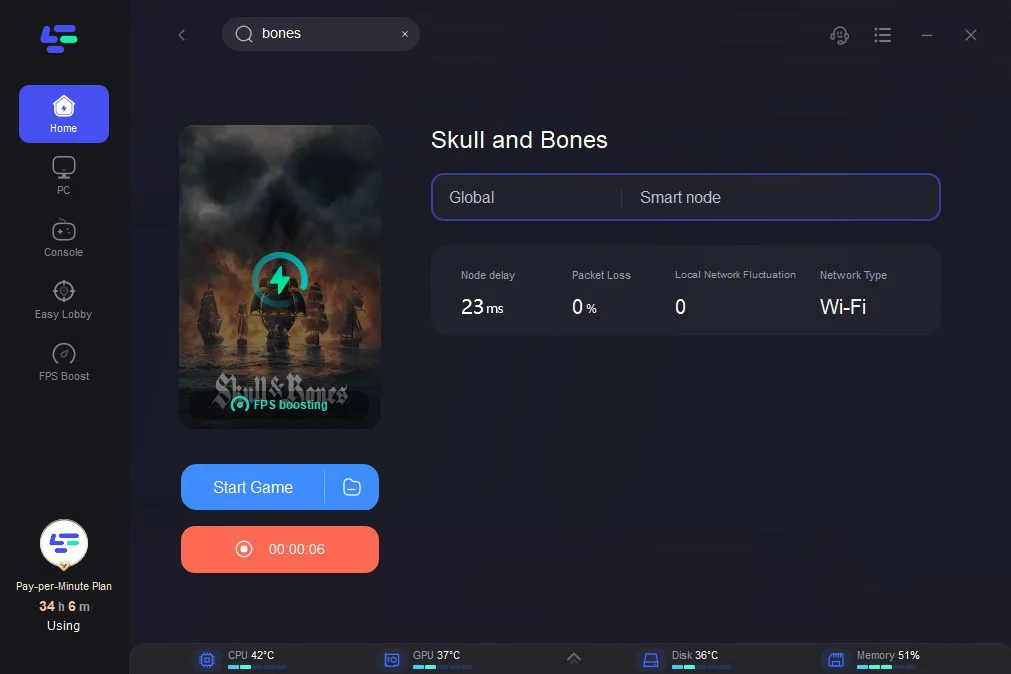
Step 4. By clicking the “Smart Boost button”, you can see the specific game ping, packet loss, and network type on the right side. Finally, click the “Start Game button” to start the game.
Changing the Servers of Skull and Bones Through In-Game Setting
Step 1. Accessing the Server Selection Menu:
Launch Skull and Bones, log in to your account then navigate to the main menu, and look for the “Server” or “Server Region” option.
Step 2. Review Server Options:
Once in the server menu, carefully review the available server options and take note of their locations, ping, and any additional information provided.
Step 3. Selecting a New Server:
Choose a server that aligns with your preferences, such as proximity, server population, or specific in-game events then click on the desired server to select it.
Step 4. Confirming Your Selection:
Most games require players to confirm their server selection to avoid accidental changes. Confirm your choice and wait for the game to process the change.
Step 5. Restart the Game if Necessary:
In some cases, changing servers may require restarting the game for the modifications to take effect. Close the game and relaunch it to ensure you are now connected to the selected server.
Step 6. Testing Your Connection:
Once back in the game, assess your connection and gameplay experience on the new server. Ensure that latency is reduced, and you are enjoying the anticipated benefits of the server switch.
Note that this method may potentially lead to high-ping issues compared with using LagoFast.
Conclusion
In conclusion, changing servers in Skull and Bones can be a game-changer, offering improved gameplay, unique content, and diverse player interactions. By following our comprehensive guide, you’ll navigate the server-switching process effortlessly, utilizing LagoFast to unlock new horizons and ensure a pirate adventure like never before.

Boost Your Game with LagoFast for Epic Speed
Play harder, faster. LagoFast game booster eliminates stutter and lags on PC, mobile, or Mac—win every match!
Quickly Reduce Game Lag and Ping!
Boost FPS for Smoother Gameplay!