

Hunting down every single skull in Halo Campaign Evolved is a rite of passage for die-hard completionists. Whether you are chasing the prestigious Headhunter achievement or just want to turn the battlefield into a chaotic sandbox with unique gameplay modifiers, this complete walkthrough covers all skull locations, requirements, and effects so you never miss a hidden collectible.

- ✅ Reduce Lag and High Ping.
✅ Boost FPS at the Same Time.
✅ Support 3000+ Popular Online Games.
✅ Change Server without Latency.
✅ Boost Game Loading Speed.
Part 1: The 39 vs. 42 Skulls Mystery: Let's Clear the Confusion
Part 2: 13-Mission Quick Directory
Part 3: Complete Walkthrough: All 39 Hidden Skull Locations
Part 4: How to Unlock Third-Person Mode (The Perspective Skull)
Part 5: Why Smooth Performance Matters for Skull Hunting & How LagoFast Helps
Part 6: Master Checklist: 39 Hidden Skulls
Part 7: Complete Summary Table: All 42 Skulls & Effects
Part 1: The 39 vs. 42 Skulls Mystery: Let's Clear the Confusion
If you have looked at the achievement list or community forums, you have probably seen two different numbers floating around: 39 and 42. Let's clear up the confusion right out of the gate so you know exactly what you are hunting for.
In Halo Campaign Evolved, there are 39 hidden skulls physically scattered across the game's 13 campaign missions. Exactly three skulls are hidden in each mission. Finding and collecting all 39 of these in-game collectibles is what triggers the official Headhunter achievement.
So where do the other three come in? As soon as you discover any three hidden skulls during your playthroughs, you unlock a brand-new game mode called Campaign Remix. When this mode unlocks, the game automatically deposits 3 bonus skulls into your inventory: Adaptation, Reload, and Armistice.
- 39 Hidden Skulls: Found physically across the 13 missions (Required for Headhunter).
- 3 Bonus Skulls (Adaptation, Reload, Armistice): Auto-unlocked after finding any 3 hidden skulls and unlocking Campaign Remix.
- 42 Total Skulls: The complete roster of gameplay modifiers available in your skull menu.
Part 2: 13-Mission Quick Directory
Need to jump straight to a specific level to clean up your missing collectibles? Use this quick directory to track down the exact mission where you need to hunt:
Mission 1: The Pillar of Autumn
Mission 3: The Truth and Reconciliation
Mission 4: The Silent Cartographer
Mission 5: Assault on the Control Room
Mission 12: Forerunner Bastion
Part 3: Complete Walkthrough: All 39 Hidden Skull Locations
Below is the exhaustive, level-by-level breakdown of all 39 hidden skull locations in Halo Campaign Evolved. Keep in mind that while most can be grabbed on Any difficulty, a few specific gameplay modifiers require you to play on Normal or higher to make them spawn.
Mission 1: The Pillar of Autumn
1. Iron Skull
- Rally Point: Alpha
- Difficulty: Any
- Missable? No (Can backtrack until entering the bridge)
- How to Get: Right after stepping out of the cryo-chamber, walk to the back of the room behind the observation glass. Jump onto the stack of yellow diagnostic canisters.
- Route / Map Guidance: Cryo-Bay 2 -> Left maintenance corridor -> Behind the technician's observation desk.
- Effect: Dying in solo play restarts the entire mission; dying in co-op reverts to the last checkpoint.
2. Grunt Birthday Party Skull
- Rally Point: Bravo
- Difficulty: Any
- Missable? Yes (Once you enter the escape pod bay, door locks behind you)
- How to Get: In the messy cafeteria area where you fight the first group of boarding Grunts, look up at the ceiling ventilation shafts. Climb the overturned vending machine to crouch-jump inside the open vent.
- Route / Map Guidance: Mess Hall -> Right-side dining area -> Ceiling duct grab.
- Effect: Headshotting Grunts triggers a shower of confetti and cheering children.
3. Boom Skull
- Rally Point: Charlie
- Difficulty: Normal or higher
- Missable? No
- How to Get: Just before entering the final escape pod sequence, check the dark maintenance alcove to the left of the airlock doors. It sits wedged between two coolant pipes.
- Route / Map Guidance: Final hallway -> Left maintenance alcove -> Behind the red pipes.
- Effect: All explosion radiuses are doubled.
Mission 2: Halo
4. Mythic Skull
- Rally Point: Alpha
- Difficulty: Any
- Missable? No
- How to Get: As soon as you step out of the escape pod wreckage, walk toward the massive waterfall in the distance. Swim behind the falling water to find a hidden dirt cave.
- Route / Map Guidance: Crash site -> North-east river canyon -> Behind the waterfall curtain.
- Effect: All Covenant enemies have double health and shields.
5. Catch Skull
- Rally Point: Bravo
- Difficulty: Normal or higher
- Missable? No
- How to Get: Drive your Warthog to the subterranean Forerunner structure where you rescue the second group of marines. Use the hood of the Warthog to jump onto the roof of the entrance pavilion.
- Route / Map Guidance: Second escape pod valley -> Forerunner bunker exterior -> Roof jump via Warthog.
- Effect: Enemies throw grenades much more frequently and drop two grenades on death.
6. Blind Skull
- Rally Point: Charlie
- Difficulty: Any
- Missable? Yes (Leaving the cliffside area triggers a cutscene)
- How to Get: In the final canyon where you snipe enemies across the bridge, look over the edge of the cliff near the Forerunner spire. There is a small rock ledge sticking out about ten feet down. Drop down carefully.
- Route / Map Guidance: Sniper cliff -> Right-side edge -> Drop down to the hidden lower shelf.
- Effect: Completely disables your heads-up display (HUD), weapon view, and arms.
Mission 3: The Truth and Reconciliation
7. Foreign Skull
- Rally Point: Alpha
- Difficulty: Any
- Missable? Yes (Entering the gravity lift locks out the canyon)
- How to Get: During the night-time sniping section, before boarding the gravity lift, walk to the far left edge of the canyon wall. Follow the narrow ledge behind the large boulder cluster.
- Route / Map Guidance: Initial sniper valley -> Western cliff face -> Hidden path behind boulders.
- Effect: You can no longer pick up or use Covenant weaponry.
8. Famine Skull
- Rally Point: Bravo
- Difficulty: Normal or higher
- Missable? No
- How to Get: Inside the ship's vehicle bay where the Wraith is parked, climb the side maintenance ladders to the third-tier catwalk. Navigate across the thin support beam running over the Warthog cages.
- Route / Map Guidance: Belly vehicle bay -> Tier 3 scaffolding -> Center overhead support beam.
- Effect: Weapons dropped by dead enemies or allies have 50% less ammo.
9. Thunderstorm Skull
- Rally Point: Delta
- Difficulty: Legendary only
- Missable? No
- How to Get: In the command bridge where you rescue Captain Keyes, clear the room and then check the sunken hologram console in the center. The skull is tucked underneath the command terminal grating.
- Route / Map Guidance: Ship bridge -> Central command platform -> Underneath the holo-table grating.
- Effect: All enemies are promoted to their highest possible rank and difficulty tier.
Mission 4: The Silent Cartographer
10. Cowbell Skull
- Rally Point: Alpha
- Difficulty: Any
- Missable? No
- How to Get: After clearing the beach landing, walk along the shoreline in the opposite direction of your mission marker (clockwise around the island). Look for a cluster of submerged rocks near the eastern tip of the island.
- Route / Map Guidance: Beach landing -> Eastern shoreline -> Submerged boulder cluster.
- Effect: Acceleration from explosions and melee strikes is increased by 50%.
11. Perspective Skull (Third-Person Mode)
- Rally Point: Bravo
- Difficulty: Normal or higher
- Missable? No
- How to Get: See the detailed step-by-step jump breakdown in our Spotlight Section above!
- Route / Map Guidance: Security facility exterior -> Right-side cliff ledges -> Grenade jump to upper terrace.
- Effect: Switches the player camera from first-person to a dynamic third-person perspective.
12. Fog Skull
- Rally Point: Delta
- Difficulty: Any
- Missable? Yes (Dropping down the central shaft prevents climbing back up)
- How to Get: Inside the map room shaft, walk down the first ramp, then turn around and look up at the ceiling support arch. Use a precision grenade jump from the ramp railing to reach the archway.
- Route / Map Guidance: Cartographer interior -> First descending ramp -> Overhead support arch.
- Effect: Your motion tracker (radar) is completely disabled.
Mission 5: Assault on the Control Room
13. Malfunction Skull
- Rally Point: Alpha
- Difficulty: Any
- Missable? No
- How to Get: When you first step out into the massive snow canyon with the Pelican crash site, look down into the chasm below the first bridge. There is a protruding Forerunner pipe sticking out of the ice wall.
- Route / Map Guidance: First snow bridge -> Look over left railing -> Drop onto the ice pipe below.
- Effect: A random element of your HUD disappears every time you respawn.
14. Eyepatch Skull
- Rally Point: Charlie
- Difficulty: Normal or higher
- Missable? No
- How to Get: In the underground cavern where you fight two Wraiths on frozen ponds, go to the far back corner behind the Forerunner structure. Climb the snow drift to reach the roof terrace.
- Route / Map Guidance: Underground ice cavern -> Rear Forerunner bunker -> Snow drift roof climb.
- Effect: Auto-aim and bullet magnetism are completely disabled for all weapons.
15. Pinata Skull
- Rally Point: Echo
- Difficulty: Any
- Missable? No
- How to Get: At the final pyramid structure leading to the Control Room, steal a Banshee and fly up to the very top spire of the pyramid instead of landing at the entrance doors.
- Route / Map Guidance: Control Room pyramid -> Fly Banshee to the top-most pinnacle -> Resting on the center apex.
- Effect: Punching enemies causes them to drop plasma and frag grenades.
Mission 6: 343 Guilty Spark
16. Black Eye Skull
- Rally Point: Alpha
- Difficulty: Normal or higher
- Missable? No
- How to Get: Right at the start of the swamp level, turn 180 degrees and walk into the mist away from the facility. You will find a half-sunken Pelican dropship. The skull is sitting inside the cockpit.
- Route / Map Guidance: Swamp spawn -> Walk south into the fog -> Sunken Pelican cockpit.
- Effect: Your energy shields no longer recharge automatically; you must melee enemies to restore them.
17. Swarm Skull
- Rally Point: Bravo
- Difficulty: Any
- Missable? Yes (Dropping down the elevator shaft locks previous floors)
- How to Get: In the facility room where you first encounter the Flood cinematic, look up at the broken observation window on the second floor. Drag a wooden crate over and jump up into the shattered frame.
- Route / Map Guidance: Flood introduction room -> Right-side wall -> Broken second-story glass window.
- Effect: Flood Infection Forms spawn in much larger swarms and deal double shield damage.
18. Recession Skull
- Rally Point: Delta
- Difficulty: Any
- Missable? No
- How to Get: As you escape the facility and sprint toward the tall light tower where the Monitor waits, check the base of the massive tree directly behind the extraction point.
- Route / Map Guidance: Extraction swamp -> Light tower base -> Behind the ancient cypress tree.
- Effect: Every shot fired drains two rounds from your weapon's magazine instead of one.
Mission 7: The Library
19. That's Just Wrong Skull
- Rally Point: Alpha
- Difficulty: Normal or higher
- Missable? No
- How to Get: On the first floor of the Index chamber, right before entering the first circular holding room, check the dark recess inside the open ceiling vent where Flood drop down from.
- Route / Map Guidance: Floor 1 hallway -> Third left turning -> Inside the low hanging ceiling vent.
- Effect: Enemies have incredible hearing and spotting range, making stealth impossible.
20. Bandanna Skull
- Rally Point: Charlie
- Difficulty: Legendary only
- Missable? Yes (Entering the elevator to floor 4 locks out floor 3)
- How to Get: On the third floor, you will reach a massive open chasm where the Monitor flies ahead to open a door. Instead of waiting, walk to the very end of the right-side catwalk and jump around the support pillar to land on a hidden ledge.
- Route / Map Guidance: Floor 3 central chasm -> Far right catwalk -> Jump around pillar 4 to the exterior alcove.
- Effect: Grants infinite ammo and infinite grenades, but disables achievement scoring when active.
21. Sputnik Skull
- Rally Point: Delta
- Difficulty: Any
- Missable? No
- How to Get: On the final floor leading to the Index platform, walk past the glowing central lift all the way to the back wall of the chamber. It sits behind a stack of Forerunner containment cubes.
- Route / Map Guidance: Floor 4 Index chamber -> Walk past the center platform -> Far back wall alcove.
- Effect: Mass of objects is greatly reduced, making explosions launch items and bodies across the map.
Mission 8: Two Betrayals
22. Ghost Skull
- Rally Point: Alpha
- Difficulty: Any
- Missable? No
- How to Get: Start the mission, walk out onto the first ledge, and hijack the closest Banshee. Fly directly underneath the Control Room bridge platform you just walked out of.
- Route / Map Guidance: Control room exit -> Fly Banshee underneath -> Support strut archway.
- Effect: AI allies and enemies no longer flinch or get staggered by gunfire or explosions.
23. Tough Luck Skull
- Rally Point: Bravo
- Difficulty: Normal or higher
- Missable? No
- How to Get: Fly your Banshee to the second pulse generator structure. Instead of landing at the door, land on the thick supply pipeline running along the side of the canyon wall opposite the generator.
- Route / Map Guidance: Second pulse valley -> Western canyon wall -> Resting on the gray supply pipeline.
- Effect: Enemies always dodge grenades, projectile weapons, and vehicles with perfect agility.
24. Berserk Skull
- Rally Point: Delta
- Difficulty: Any
- Missable? Yes (Destroying the final pulse generator ends the level instantly)
- How to Get: In the third pulse generator room, clear the Covenant and Flood forces. Walk behind the glowing core generator itself and look down into the cooling trench.
- Route / Map Guidance: Third pulse generator room -> Behind the main core -> Inside the floor trench.
- Effect: Enemies enter a berserk rage state much faster and attack with increased aggression.
Mission 9: Keyes
25. Assassins Skull
- Rally Point: Alpha
- Difficulty: Normal or higher
- Missable? Yes (Dropping through the coolant floor holes prevents returning up)
- How to Get: Inside the Covenant cruiser's lower bay where you fight Special Operations Elites, check the upper storage shelves. You need to crouch-jump from a purple supply crate to reach the top shelf.
- Route / Map Guidance: Lower cargo bay -> Right side storage racks -> Top tier shelf.
- Effect: All Covenant enemies are permanently cloaked in active camouflage.
26. Jacked Skull
- Rally Point: Bravo
- Difficulty: Any
- Missable? No
- How to Get: When you reach the outdoor ravine where the dropship crashed, walk down into the toxic green coolant pool at the bottom of the ravine. The skull sits on a dry rock island in the center of the slime.
- Route / Map Guidance: Outdoor ravine -> Bottom valley floor -> Center rock in the green coolant pool.
- Effect: You can only pilot ground or air vehicles by hijacking them directly from enemies.
27. Impulse Skull
- Rally Point: Charlie
- Difficulty: Any
- Missable? No
- How to Get: In the command bridge where you find Captain Keyes absorbed by the Flood proto-gravermind, check the lower control pit directly underneath the organic biomass hanging from the ceiling.
- Route / Map Guidance: Infected command bridge -> Central control pit -> Directly under the proto-gravermind mass.
- Effect: All projectile weapons (Rocket Launchers, Fuel Rods, Plasma) travel 50% faster.
Mission 10: The Maw
28. Tilt Skull
- Rally Point: Alpha
- Difficulty: Normal or higher
- Missable? Yes (Entering the engine room locks the cafeteria section)
- How to Get: In the destroyed mess hall where you fight Flood and Sentinels, use a grenade jump to get onto the second-story balcony that has a broken access ladder.
- Route / Map Guidance: Destroyed mess hall -> Left side balcony -> Jump up to the upper dining deck.
- Effect: Enemy armor resistances and weaknesses are greatly magnified (plasma strips shields faster, bullets do almost nothing to shields).
29. Feather Skull
- Rally Point: Bravo
- Difficulty: Any
- Missable? No
- How to Get: Inside the engine room where you must destroy the fusion manifolds, go to the top floor catwalk of Engine Core 3. Walk to the very end of the exhaust railing.
- Route / Map Guidance: Engine Room -> Core 3 (Northern-most) -> Top floor exhaust catwalk railing.
- Effect: Melee strikes push enemies and vehicles away with immense gravitational force.
30. Bountiful Skull
- Rally Point: Delta
- Difficulty: Any
- Missable? Yes (Driving into the Longsword hangar triggers the ending cinematic)
- How to Get: During the Warthog escape run, stop your vehicle at the 1,500-meter marker where a massive bridge section is missing. Get out and look down at the lower structural beam connecting the two road sections.
- Route / Map Guidance: Warthog run (1,500m remaining) -> Broken bridge gap -> Drop to the lower support strut.
- Effect: Ammunition pickups from weapons on the ground grant double the standard ammo rounds.
Mission 11: Outpost Alpha (Evolved Campaign)
31. Hollow Skull
- Rally Point: Alpha
- Difficulty: Any
- Missable? No
- How to Get: At the outer security perimeter of the Forerunner communication relay, check behind the large automated anti-air turret on the northern ridge.
- Route / Map Guidance: North ridge defense perimeter -> Behind AA Turret 02 -> Inside the power conduit trench.
- Effect: Your Spartan only has energy shields; you have no underlying health bar once shields drop.
32. Masterblaster Skull
- Rally Point: Bravo
- Difficulty: Normal or higher
- Missable? Yes (Activating the relay tower locks the exterior courtyard)
- How to Get: Climb the scaffolding surrounding the communication dish. Halfway up, jump off the ladder onto the hanging cargo crane arm.
- Route / Map Guidance: Central relay tower -> Mid-level scaffolding -> Walk out onto the yellow crane arm.
- Effect: One random weapon in your loadout deals massive damage, while the other deals almost none, swapping every reload.
33. Warlord Skull
- Rally Point: Charlie
- Difficulty: Legendary only
- Missable? No
- How to Get: Inside the relay control center, defeat the brute Chieftain boss. Before pulling the extraction lever, look inside the weapon rack alcove where he spawned.
- Route / Map Guidance: Command Nexus -> Chieftain spawn alcove -> Top shelf above the Gravity Hammers.
- Effect: All high-ranking enemies gain personal overshields that regenerate continuously.
Mission 12: Forerunner Bastion (Evolved Campaign)
34. Bonded Pair Skull
- Rally Point: Alpha
- Difficulty: Any
- Missable? No
- How to Get: As you cross the light bridge into the ancient fortress, look to your left. There is a secondary, unlit bridge section floating in the abyss. Use a Banshee or precision jump to reach it.
- Route / Map Guidance: Main entrance light bridge -> Left side abyss -> Dormant bridge section.
- Effect: When playing co-op, if your partner dies, you receive a 100% damage boost for 10 seconds.
35. Scarcity Skull
- Rally Point: Bravo
- Difficulty: Normal or higher
- Missable? Yes (Sealing the blast doors cuts off the lower armory)
- How to Get: Navigate to the lower Forerunner armory. Look for a broken glass display case containing ancient Forerunner armor. The skull rests between the boots of the armor suit.
- Route / Map Guidance: Sub-level armory -> Vault 4 -> Inside the shattered armor display case.
- Effect: Ammo crates and weapon racks throughout the campaign contain 75% fewer rounds.
36. Momentum Skull
- Rally Point: Delta
- Difficulty: Any
- Missable? No
- How to Get: In the central core room where rotating gravity rings spin around the room, jump onto the second spinning ring. Ride it up to the ceiling maintenance walkway.
- Route / Map Guidance: Gravity Core room -> Ride Ring 2 to top dead center -> Ceiling maintenance catwalk.
- Effect: Every kill increases your movement speed and reload speed by 5% for 8 seconds, stacking up to 5 times.
Mission 13: The Ring's Heart (Evolved Campaign)
37. Eclipse Skull
- Rally Point: Alpha
- Difficulty: Normal or higher
- Missable? No
- How to Get: During the descent into the core chamber, stop at the third elevator landing. Walk around to the rear of the elevator shaft exterior.
- Route / Map Guidance: Core descent lift -> Landing platform 3 -> Behind the elevator shaft structure.
- Effect: The entire game world is plunged into darkness; your flashlight battery drains twice as fast and recharges slowly.
38. Dynamo Skull
- Rally Point: Bravo
- Difficulty: Any
- Missable? Yes (Entering the inner sanctum triggers a point-of-no-return save)
- How to Get: In the room with the four pulsing energy pylons, climb to the top of Pylon North. Use the glowing energy conduit to balance your way across to the central hanging chandelier.
- Route / Map Guidance: Pylon chamber -> North Pylon apex -> Tightrope walk the energy beam to the center structure.
- Effect: Energy weapons (Plasma Rifles, Plasma Pistols) never overheat, but they drain battery power 50% faster per shot.
39. Oblivion Skull
- Rally Point: Delta
- Difficulty: Legendary only
- Missable? No
- How to Get: In the final arena where you fight the Flood Juggernaut boss, do not end the level after killing it. Check the rubble pile directly beneath the destroyed Forerunner statue in the center of the room.
- Route / Map Guidance: Final boss arena -> Center statue ruins -> Inside the hollow space beneath the stone head.
- Effect: Dying resets your checkpoint and removes one random weapon from your inventory upon respawning.
Part 4: How to Unlock Third-Person Mode (The Perspective Skull)
One of the most exciting additions in Halo Campaign Evolved is the ability to play the entire campaign in a sleek, over-the-shoulder camera view. To unlock third-person mode, you must locate and activate the Perspective Skull.
Where to Find the Perspective Skull
- Mission: Mission 9 (Two Betrayals)
- Rally Point: Alpha
- Difficulty Required: Normal or higher
- Location: On top of the first pulse generator structure in the open frozen canyon.
Step-by-Step Retrieval Guide
Step 1. Play through Two Betrayals until you reach the open outdoor canyon where Covenant Banshees are dogfighting in the sky.
Hijack or hijack-spawn an enemy Banshee flyer from the landing platform near the canyon bridge.
Step 2. Fly your Banshee toward the giant Forerunner pulse generator spire (the first main objective tower pulsing with blue energy).
Step 3. Instead of landing at the main entrance door, ascend all the way to the very top roof ring of the structure.
Step 4. Carefully exit your Banshee on the narrow metallic support beam overlooking the canyon below.
Step 5. Walk to the center of the roof ring; you will see the glowing Perspective Skull resting on a raised Forerunner pedestal. Hold your action button to claim it!
Once activated in your pre-game lobby menu, the Perspective Skull shifts your camera back behind your Spartan, giving you a wider tactical field of view and allowing you to see your customized armor during live gameplay.
Part 5: Why Smooth Performance Matters for Skull Hunting & How LagoFast Helps
Let's be honest: hunting skulls isn't just about knowing where to look. It requires mechanical precision. Many of the hardest Halo Campaign Evolved skull locations force you to pull off tricky grenade jumps, crouch-jump onto pixel-thin ledges, or survive endless waves of Covenant forces on Legendary difficulty just to reach a secret platform.
If your frame rate drops during a precise jump, or if high ping causes lag spikes while you're playing co-op campaign with a friend, you'll plummet to your death and force a checkpoint reload. Even worse, an unexpected game crash midway through a 45-minute Legendary run can wipe out your collectible progress entirely before the checkpoint saves.
This is where LagoFast Game Booster becomes essential for achievement hunters:
- Lag Reducer & Ping Booster: Using smart multi-path technology, LagoFast automatically connects you to the fastest global server routes. If you are joining an overseas friend's co-op lobby to hunt collectibles together, it stabilizes your connection and eliminates input delay so your grenade jumps land perfectly.
- FPS Booster: By optimizing your PC's background processes and CPU/GPU resource allocation, LagoFast locks in smooth, high frame rates—ensuring zero stutter when looking around complex environments or scanning dark corners for glowing skulls.
- One-Click Game Crash Fix Tool: Nothing ruins a legendary skull hunt like a fatal desktop crash right before you grab the collectible. LagoFast includes a built-in repair tool that diagnoses and fixes game crash triggers, corrupted cache files, and memory leaks with a single click, keeping your campaign runs stable from start to finish.
Tutorial: Use LagoFast to Ensure Halo Campaign Evolved Smooth Performance:
Step 1: Click the Free Trial button to download and install LagoFast.
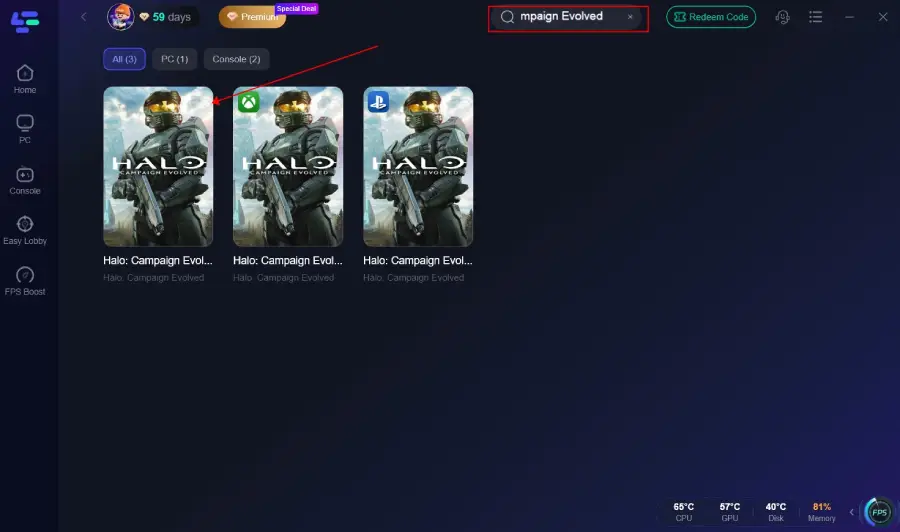
Step 2: Open LagoFast, then click the PC button on the left, search for Halo Campaign Evolved in the search bar, and click it after it appears.
Step 3: Click the FPS Unlocker Tool on the right to boost FPS.
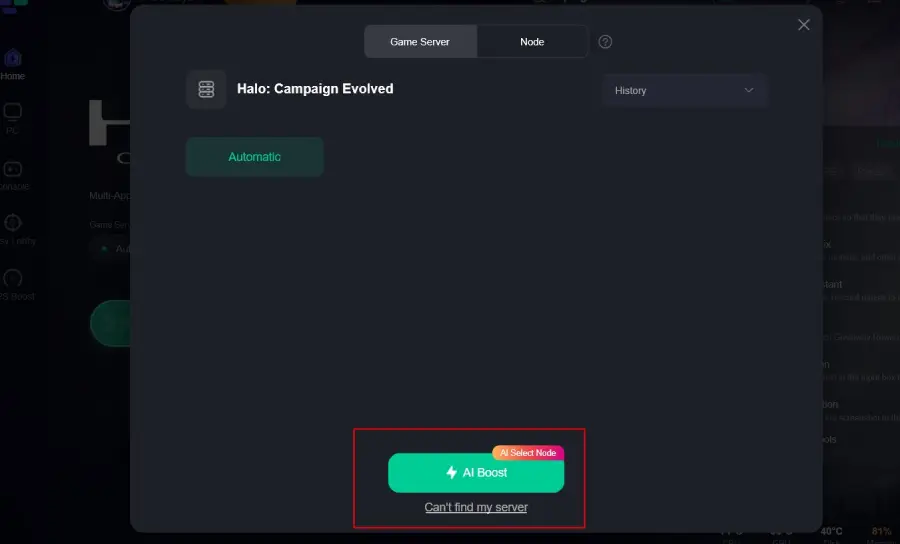
Step 4: Click on “Server” to change to a better server that ensures a better gaming experience, then click on “Smart Boost” to fix Halo Campaign Evolved lag and stuttering.
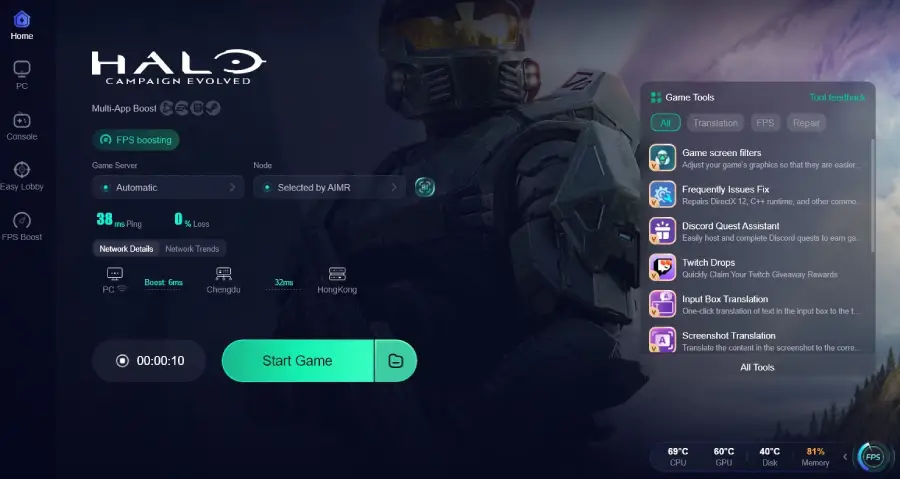
Step 5: Check the specific game ping, packet loss, and multiple path connections on the right side. Finally, click “Start Game” to play the game.
Part 6: Master Checklist: 39 Hidden Skulls
Use this clean table format checklist to keep track of your collectibles as you work your way toward the Headhunter achievement.
|
Check |
# |
Skull Name |
Mission Location |
Difficulty Req. |
Missable? |
|
[ ] |
01 |
Iron |
Mission 1: The Pillar of Autumn |
Normal+ |
No |
|
[ ] |
02 |
Mythic |
Mission 1: The Pillar of Autumn |
Normal+ |
No |
|
[ ] |
03 |
Boom |
Mission 1: The Pillar of Autumn |
Normal+ |
Yes |
|
[ ] |
04 |
Fog |
Mission 2: Ringfall |
Normal+ |
No |
|
[ ] |
05 |
Foreign |
Mission 2: Ringfall |
Normal+ |
No |
|
[ ] |
06 |
Famine |
Mission 2: Ringfall |
Normal+ |
No |
|
[ ] |
07 |
Bandana |
Mission 3: Halo |
Heroic+ |
No |
|
[ ] |
08 |
Eye Patch |
Mission 3: Halo |
Normal+ |
No |
|
[ ] |
09 |
Piñata |
Mission 3: Halo |
Normal+ |
No |
|
[ ] |
10 |
Grunt Birthday Party |
Mission 4: Truth and Reconciliation |
Normal+ |
No |
|
[ ] |
11 |
Malfunction |
Mission 4: Truth and Reconciliation |
Normal+ |
Yes |
|
[ ] |
12 |
Recession |
Mission 4: Truth and Reconciliation |
Normal+ |
No |
|
[ ] |
13 |
Black Eye |
Mission 5: The Silent Cartographer |
Normal+ |
No |
|
[ ] |
14 |
Blind |
Mission 5: The Silent Cartographer |
Normal+ |
No |
|
[ ] |
15 |
Catch |
Mission 5: The Silent Cartographer |
Heroic+ |
Yes |
|
[ ] |
16 |
Cowbell |
Mission 6: Assault on the Control Room |
Normal+ |
No |
|
[ ] |
17 |
IWHBYD |
Mission 6: Assault on the Control Room |
Legendary |
Yes |
|
[ ] |
18 |
Thunderstorm |
Mission 6: Assault on the Control Room |
Normal+ |
No |
|
[ ] |
19 |
Tilt |
Mission 7: 343 Guilty Spark |
Normal+ |
No |
|
[ ] |
20 |
Tough Luck |
Mission 7: 343 Guilty Spark |
Normal+ |
No |
|
[ ] |
21 |
Cloud |
Mission 7: 343 Guilty Spark |
Normal+ |
No |
|
[ ] |
22 |
Feather |
Mission 8: The Library |
Normal+ |
No |
|
[ ] |
23 |
Envy |
Mission 8: The Library |
Heroic+ |
Yes |
|
[ ] |
24 |
Assassins |
Mission 8: The Library |
Legendary |
No |
|
[ ] |
25 |
Perspective |
Mission 9: Two Betrayals |
Normal+ |
No |
|
[ ] |
26 |
Swarm |
Mission 9: Two Betrayals |
Normal+ |
No |
|
[ ] |
27 |
Hypertrophy |
Mission 9: Two Betrayals |
Heroic+ |
No |
|
[ ] |
28 |
Prophet |
Mission 10: Keyes |
Normal+ |
No |
|
[ ] |
29 |
Jacked |
Mission 10: Keyes |
Normal+ |
No |
|
[ ] |
30 |
EMP |
Mission 10: Keyes |
Normal+ |
Yes |
|
[ ] |
31 |
Angers |
Mission 11: The Maw |
Normal+ |
No |
|
[ ] |
32 |
Bitchslap |
Mission 11: The Maw |
Normal+ |
No |
|
[ ] |
33 |
Ghost |
Mission 11: The Maw |
Normal+ |
Yes |
|
[ ] |
34 |
Vanguard |
Mission 12: Reclamation |
Heroic+ |
No |
|
[ ] |
35 |
Reflex |
Mission 12: Reclamation |
Normal+ |
No |
|
[ ] |
36 |
Overdrive |
Mission 12: Reclamation |
Normal+ |
No |
|
[ ] |
37 |
Aftermath |
Mission 13: The Silent Cartographer: Evolved |
Normal+ |
No |
|
[ ] |
38 |
Eclipse |
Mission 13: The Silent Cartographer: Evolved |
Heroic+ |
No |
|
[ ] |
39 |
Singularity |
Mission 13: The Silent Cartographer: Evolved |
Legendary |
Yes |
Part 7: Complete Summary Table: All 42 Skulls & Effects
Here is the master summary of all 42 skulls available in Halo Campaign Evolved, including the 39 hidden mission collectibles and the 3 bonus remix skulls automatically awarded upon unlocking Campaign Remix.
|
# |
Skull Name |
Type / Source |
Exact Gameplay Modifier Effect |
|
1 |
Iron |
Hidden (Mission 1) |
Solo: Restart mission on death. Co-op: Revert to checkpoint if any player dies. |
|
2 |
Mythic |
Hidden (Mission 1) |
All enemies gain double health and shielding capacity. |
|
3 |
Boom |
Hidden (Mission 1) |
Explosion radius and physical blast force are doubled. |
|
4 |
Fog |
Hidden (Mission 2) |
Disables the motion tracker radar completely. |
|
5 |
Foreign |
Hidden (Mission 2) |
Players cannot pick up or fire Covenant weaponry. |
|
6 |
Famine |
Hidden (Mission 2) |
Weapons dropped by AI enemies contain 50% less ammo. |
|
7 |
Bandana |
Hidden (Mission 3) |
Grants infinite ammunition, infinite grenades, and removes equipment cooldowns. |
|
8 |
Eye Patch |
Hidden (Mission 3) |
Disables auto-aim, target friction, and bullet magnetism. |
|
9 |
Piñata |
Hidden (Mission 3) |
Enemies drop armed or unarmed plasma grenades when struck by melee attacks. |
|
10 |
Grunt Birthday Party |
Hidden (Mission 4) |
Headshotting Grunts triggers a celebratory confetti blast and cheering audio. |
|
11 |
Malfunction |
Hidden (Mission 4) |
A random UI HUD element disappears permanently upon each player respawn. |
|
12 |
Recession |
Hidden (Mission 4) |
Every shot fired drains two rounds from your weapon's magazine. |
|
13 |
Black Eye |
Hidden (Mission 5) |
Energy shields do not recharge automatically; you must melee hit enemies to recharge. |
|
14 |
Blind |
Hidden (Mission 5) |
Removes HUD, first-person weapon model, and crosshair completely. |
|
15 |
Catch |
Hidden (Mission 5) |
Enemies throw grenades twice as frequently and drop extra grenades on death. |
|
16 |
Cowbell |
Hidden (Mission 6) |
Physical impulse acceleration from explosions is tripled. |
|
17 |
IWHBYD |
Hidden (Mission 6) |
Unlocks rare, secret, and humorous combat dialogue barks from NPCs. |
|
18 |
Thunderstorm |
Hidden (Mission 6) |
Promotes most Covenant and Flood enemies to their highest tier rank. |
|
19 |
Tilt |
Hidden (Mission 7) |
Enemy armor weaknesses and resistances are amplified significantly. |
|
20 |
Tough Luck |
Hidden (Mission 7) |
Enemies dodge incoming grenades, vehicles, and slow projectiles with 100% success rate. |
|
21 |
Cloud |
Hidden (Mission 7) |
Radar only pings enemies when they fire weapons or sprint aggressively. |
|
22 |
Feather |
Hidden (Mission 8) |
Player jump height increases by 50%, and melee attacks deal massive knockback physics. |
|
23 |
Envy |
Hidden (Mission 8) |
Replaces the standard flashlight utility with a 5-second Active Camouflage cloak. |
|
24 |
Assassins |
Hidden (Mission 8) |
All enemies in the level gain permanent active camouflage cloaking. |
|
25 |
Perspective |
Hidden (Mission 9) |
Shifts the player camera from first-person to an over-the-shoulder third-person view. |
|
26 |
Swarm |
Hidden (Mission 9) |
Flood Infection forms spawn in 2x quantities and move 30% faster. |
|
27 |
Hypertrophy |
Hidden (Mission 9) |
Enemies scale up 20% in physical size and gain extended melee reach. |
|
28 |
Prophet |
Hidden (Mission 10) |
Standard enemy plasma weapons occasionally fire tracking Needler-style bolts. |
|
29 |
Jacked |
Hidden (Mission 10) |
Vehicles can only be entered by actively hijacking them from enemy drivers. |
|
30 |
EMP |
Hidden (Mission 10) |
Shield breakage releases an EMP wave that disables nearby shields and vehicles. |
|
31 |
Angers |
Hidden (Mission 11) |
AI attack aggression increases; enemies fire faster and never retreat from combat. |
|
32 |
Bitchslap |
Hidden (Mission 11) |
Enemy melee attacks deal 3x damage and apply heavy launch physics to players. |

Boost Your Game with LagoFast for Epic Speed
Play harder, faster. LagoFast game booster eliminates stutter and lags on PC, mobile, or Mac—win every match!
Quickly Reduce Game Lag and Ping!
Boost FPS for Smoother Gameplay!