
If you want to build a highly reliable survivor loadout in Dead by Daylight right now, start with:
Adrenaline, Sprint Burst, Dead Hard, Decisive Strike, Borrowed Time, Kindred, Prove Thyself, Lithe, and Resilience.
These perks consistently perform across different skill levels, killer matchups, and maps, making them the backbone of the current survivor meta.
If your chase timing, vaults, or skill checks feel inconsistent due to ping spikes or unstable matchmaking, tools like LagoFast can help stabilize your connection and make gameplay smoother.
Part 1: Best Survivor Perks by Role and Impact
Part 2: Which Survivor Perks to Unlock First
Part 3: Best Survivor Perks by Situation
Part 4: Best Survivor Builds by Playstyle
Part 5: Perk Synergy, Items, and Gameplay Habits
Part 6: Solo Queue vs SWF – Perk Value Changes
Part 7: Common Mistakes and Overrated Perks
Part 8: Connection Stability with LagoFast Game Booster
Part 1: Best Survivor Perks in Dead by Daylight by Role and Impact
S-Tier Survivor Perks (Core Meta Picks)
These perks remain strong in almost any lobby and fit into most builds.
Adrenaline (Best Endgame Perk)
Adrenaline is one of the strongest perks for completely shifting endgame momentum in Dead by Daylight, because when the exit gates are powered it instantly does two things: it restores the equivalent of one health state and grants a 50% movement speed boost for 3 seconds.
Why it is considered top-tier:
- It can instantly turn a losing chase into a full reset or a clean escape, often removing pressure at the exact moment killers are trying to close out the match.
- It punishes killers who overcommit before the last generator is completed, forcing them into unfavorable trades or wasted pressure.
- It fits naturally into solo queue, chase-oriented builds, and endgame-focused setups without requiring any setup or conditional planning.
If you are unsure what to put in your final perk slot, Adrenaline remains one of the safest, most universally effective choices in the entire game.
Sprint Burst (Most Reliable Exhaustion Perk)
Sprint Burst remains one of the most reliable exhaustion perks because it provides instant distance on demand. While exact current numerical values are not always necessary for practical evaluation, it consistently stays relevant in community discussions, and the Sprint Burst + Adrenaline combination on Meg is widely regarded as one of the strongest free-survivor perk progressions.
Why players continue to pick it:
- It helps you reach strong tiles before taking the first hit, which often determines how long a chase can be extended.
- It allows efficient repositioning in solo queue without relying on teammate coordination, giving you independence in rotations.
- It performs well on almost any map and against nearly any killer, making it a universally stable choice rather than a situational one.
Its main drawback is control. If you waste it during simple traversal or low-pressure movement, you lose most of its strategic value and reduce its impact in actual chases.
Dead Hard (High-Skill Chase Perk)
Dead Hard remains one of the most impactful chase perks when used correctly. In its current described form, after being unhooked or self-unhooked, it activates while you are injured and sprinting, allowing you to avoid the next instance of damage.
Why it is still considered elite:
- It can completely cancel a down at a critical moment in a chase, often reversing what would otherwise be a guaranteed loss of health state.
- It provides strong value against killers with predictable attack timing, where well-timed activation can consistently negate hits.
- It performs best in the hands of players who have strong timing awareness and understand when a killer is about to commit to a strike.
Dead Hard is not the easiest perk in this list to use effectively, but its ceiling remains extremely high, which is why it still belongs in the S-tier category for chase-focused survivor play.
Decisive Strike (Best Anti-Tunneling Perk)
Decisive Strike is your most direct counter to tunneling. The available data indicates that after being unhooked or self-unhooked, it activates for up to 60 seconds. If the killer picks you up within that window, you can pass a skill check to escape their grasp and stun them.
Why it remains meta:
- It forces killers to think twice before committing to a tunnel immediately after an unhook, often changing their decision-making entirely.
- It provides personal protection in solo queue that cannot be reliably replaced by teammate coordination or communication.
- It gives you crucial time to reset pressure, hide, or rotate to a safer position, rather than being immediately eliminated from the match.
It is not universally valuable in every single situation, but when tunneling does occur, few perks have a higher impact on survival and tempo control.
A-Tier Survivor Perks (Reliable Build Options)
Borrowed Time (Best Rescue Perk)
Borrowed Time is one of the cleanest and most reliable rescue perks in the game. The available data indicates that survivors you unhook receive an extended Endurance effect lasting 6/8/10 seconds.
Why it is strong:
- It makes unsafe hook rescues significantly more survivable, reducing the chance of immediate punishment right after an unhook.
- It helps prevent instant trade situations, where the rescued survivor is quickly downed again before they can reposition.
- It fits naturally into altruistic builds and solo queue play, where coordination is limited and rescue safety cannot always be guaranteed.
If you are frequently the player going for unhooks, Borrowed Time consistently provides clear, practical value in most match scenarios.
Kindred (Best Solo Queue Perk)
Kindred is one of the strongest solo queue perks because information directly translates into better decision-making and fewer wasted actions. While the exact in-game numerical details may vary, its core function is consistent: it provides vision and awareness around hooked survivors, revealing important team and killer positioning information.
Why it is so strong in solo queue:
- It reduces duplicated rescue attempts, preventing multiple survivors from leaving generators unnecessarily for the same hook.
- It helps teammates stay on generators when a rescue is already being handled, improving overall objective efficiency.
- It adds structure to otherwise uncoordinated teams by clarifying who should rotate, who should stay, and when pressure is actually dangerous.
In solo queue environments, Kindred often delivers more consistent practical value than more flashy or aggressive perks because it removes guesswork from critical hook situations.
Prove Thyself (Best Generator Perk)
Prove Thyself remains a popular objective-focused perk because generator repair speed is still a key factor in winning matches, especially when survivors are able to work together efficiently. Community discussions and build guides consistently associate it with generator-oriented loadouts.
Why it is included:
- It is excellent when your goal is to pressure and complete generators quickly, especially in coordinated situations where multiple survivors are working on objectives at the same time.
- It becomes particularly strong in duo or SWF environments, where players are more likely to stack on generators and benefit directly from the cooperative repair bonus.
- It can still provide value in solo queue if teammates naturally group together during the early or mid-game, even without voice communication.
That said, perks focused purely on repair efficiency are at their strongest only when the team survives long enough and maintains enough coordination to actually take advantage of the speed advantage.
Lithe (Best Beginner Exhaustion Perk)
Lithe is widely considered the most beginner-friendly alternative to Sprint Burst for many players. In community discussions around free survivors, it is often highlighted that Feng Min’s Lithe is easier for newer players to understand and use consistently.
Why Lithe works so well:
- It has a simple activation condition through performing a fast vault, making it intuitive even for less experienced players.
- For beginners, it feels more natural and less restrictive than Sprint Burst, since it does not require careful management of exhaustion timing during movement.
- It performs especially well on maps with strong window and pallet routing, where frequent vaults naturally trigger its effect during normal chase paths.
If Sprint Burst feels awkward or difficult to manage, Lithe is often the cleanest and most straightforward replacement that still provides reliable chase mobility.
Resilience (High Efficiency Perk)
Resilience is one of the strongest value-per-slot perks for players who are comfortable staying injured and playing efficiently under pressure. It fits well into generator-focused builds, chase-oriented setups, and flexible solo queue loadouts.
Why experienced players rate it so highly:
- It rewards efficient injured-state gameplay, turning a “weaker” condition into a consistent speed advantage rather than something to immediately fix.
- It improves both objective speed and micro-movement efficiency, which matters in tight loops, risky rotations, and last-second interactions.
- It naturally synergizes with disciplined medkit usage and endgame pressure, where healing decisions become strategic rather than automatic.
It is not the most beginner-friendly perk, since new players often feel forced to heal immediately, but it provides excellent long-term value once you understand when staying injured is actually optimal.
Part 2: Which Survivor Perks to Unlock First
Don’t unlock everything at once—focus on versatile perks.
Priority Order
- Sprint Burst or Lithe — first choose your exhaustion perk
- Adrenaline — extremely high value in almost every match
- Kindred — a major quality-of-life perk for solo queue
- Borrowed Time — makes rescues significantly safer
- Decisive Strike — if tunneling is common in your matches
- Prove Thyself — if you prefer objective-focused gameplay
- Resilience — once you become comfortable playing injured
- Dead Hard — very strong, but shines most when you already have good timing and chase experience
Best Free Survivor Path
Meg remains the most recommended starting survivor. The community consistently praises her perks, especially Sprint Burst and Adrenaline, as some of the strongest free survivor options available. This makes her one of the best early unlock choices for players who want to quickly build a practical and effective account.
If you want a simpler alternative, Feng Min is also a strong beginner-friendly option, since Lithe is often easier for some players to control and use consistently.
Part 3: Best Survivor Perks by Situation
Best for Solo Queue: Kindred
Solo queue is primarily a communication problem. Kindred solves it without requiring voice chat.
Use it when:
- You are tired of seeing two teammates leave generators for a single hook.
- No one understands whether the killer is camping or has already rotated away.
- You want more stable matches instead of occasional highlight plays.
Best for Pure Chase: Sprint Burst or Dead Hard
The choice depends on how confident you feel in chase situations.
- Sprint Burst is simpler and safer because it provides instant distance and immediate breathing room.
- Dead Hard is stronger in tight chases but requires better timing and game sense.
- Lithe serves as a middle-ground option for players who are comfortable with window-based routing and map traversal.
Best Against Tunneling: Decisive Strike
If the killer begins chasing you immediately after being unhooked, Decisive Strike remains the most direct counter available based on current game data.
Use it when:
- Killers heavily commit to tunneling you after unhook.
- You do not trust teammates for bodyblocking or distraction plays.
- You want a single perk slot dedicated entirely to punishing tunneling behavior.
Best for Rescue Value: Borrowed Time
Borrowed Time performs best in matches where hook trades, basement rescues, and risky unhooks determine momentum.
Use it when:
- You are frequently the player going for rescues.
- Killers often hover around hooks.
- Your team struggles to convert unhooks into real pressure resets.
Best for Endgame: Adrenaline
Adrenaline becomes most powerful in matches that reach the final generator with multiple survivors still alive.
Use it when:
- You often survive into the endgame phase.
- Your team is capable of finishing generators under pressure.
- You want a perk that can instantly swing the final chase or escape situation.
Best Comfort Perk That Is Not Always Optimal: Self-Care
Self-Care remains a comfort pick for many players because it allows self-healing without a medkit. However, available data confirms it only heals at 25/30/35% of normal healing speed.
And that is its main issue.
Self-Care may feel safe, but in efficient lobbies it is often too slow compared to:
- finding a teammate for healing,
- bringing a medkit,
- or staying injured and benefiting from Resilience when the situation allows.
It can be used, but it is not considered a top-tier meta perk.
Part 4: Best Survivor Builds by Playstyle
If you need ready-made loadouts instead of individual perk rankings, start here.
For additional build ideas, you can also check community collections such as “best survivor builds in DBD”, but below are the most practical starter loadouts based on current game logic and available data.
1. Best Solo Queue Build
Kindred
Sprint Burst
Decisive Strike
Adrenaline
Why it works:
- Kindred covers the lack of information in solo queue.
- Sprint Burst protects your routing in early and mid-game chases.
- Decisive Strike protects you from tunneling pressure.
- Adrenaline provides a strong safety net in the endgame.
This is the most safe and universally consistent build for players entering matches alone.
2. Best Generator-Focused Build
Prove Thyself
Resilience
Sprint Burst or Lithe
Adrenaline
Why it works:
- Prove Thyself increases generator pressure when multiple survivors work together.
- Resilience provides value while injured.
- Your exhaustion perk helps you survive long enough to keep working on objectives.
- Adrenaline pays off immediately when the final generator is completed.
Bring a toolbox here if your goal is pure objective pressure.
3. Best Anti-Tunneling Build
Decisive Strike
Dead Hard
Borrowed Time
Adrenaline
Why it works:
- Decisive Strike punishes direct tunneling attempts.
- Dead Hard can save you in the next chase after an unhook.
- Borrowed Time helps your team perform safer rescues from the start.
- Adrenaline provides a late-game reset if the match reaches endgame.
If you are often the killer’s main target, start with this build.
4. Best Altruism / Rescue Build
Borrowed Time
Kindred
Sprint Burst or Lithe
Resilience
Why it works:
- Borrowed Time improves rescue safety.
- Kindred shows when rescues are actually necessary.
- Sprint Burst or Lithe help you enter and exit rescue situations quickly.
- Resilience provides value while you remain active and injured.
Bring a medkit if you expect frequent pressure resets and healing cycles.
5. Best Endgame Build
Adrenaline
Sprint Burst
Borrowed Time
Decisive Strike
Why it works:
- Adrenaline is the core of the entire build.
- Sprint Burst provides immediate routing value under gate pressure.
- Borrowed Time helps execute late hook rescues safely.
- Decisive Strike punishes killers attempting final kills through tunneling.
Community guides also note that endgame-focused builds are particularly strong because killers often become significantly more aggressive during the Endgame Collapse.
Part 5: Synergy Between Perks, Items, and Gameplay Habits That Make These Builds Stronger
Perks only form one part of a build. Items and decision-making need to match the role your perks are trying to fulfill.
Medkits and When to Use Them
Use a medkit with:
Dead Hard-based builds
Resilience-focused builds
Builds centered around frequent rescues
Why: a medkit gives you control over when pressure is removed. Instead of relying on teammates to heal you at the right moment, you decide when to reset yourself and stay active in the match.
This also reduces downtime after risky plays, especially in solo queue where coordination is inconsistent.
Toolboxes and When to Use Them
Use a toolbox with:
Prove Thyself-based builds
Duo or SWF setups focused on objective pressure
Why: if your build is designed around generator speed, you should fully commit to that role. A toolbox amplifies the exact pressure your perks are already supporting, turning short coordinated repairs into meaningful progress swings.
Best Habits for Exhaustion Perks
With Sprint Burst, avoid wasting it purely on simple map traversal unless you are actively threatened.
With Dead Hard, save it for moments where the killer is committed to a hit rather than using it reactively in panic situations.
With Lithe, plan your routes in advance around vault locations so the activation becomes intentional rather than reactive. It works best when you are already thinking in loops, not improvising under pressure.
Best Habits for Decisive Strike
If you are running Decisive Strike, your goal is to preserve its threat.
This means:
avoid running into dead zones immediately after being unhooked
avoid panic actions that make you an easy second down
use the post-unhook window to create distance or force a more difficult re-engagement from the killer
The perk is strongest when the killer is forced to consider whether tunneling you is worth the risk, so your behavior should reinforce that uncertainty.
Why Adrenaline Changes Endgame Decision-Making
When using Adrenaline, there are situations where staying on the last generator while injured is correct, because the perk can instantly convert a risky state into full healing plus a speed burst the moment the final generator is completed.
This does not mean you should greed every objective. It means your threshold for committing to high-risk generator progress can be higher, because the payoff is immediate and often decisive in endgame scenarios.
Part 6: Solo Queue vs SWF: Which Perks Get Better or Worse?
In Solo Queue
Priority:
Kindred
Decisive Strike
Sprint Burst
Adrenaline
Why:
Solo queue lacks communication, so you need self-sufficiency, information, and protection against tunneling. Kindred becomes extremely valuable because it replaces missing team coordination. Decisive Strike gains value because you cannot rely on teammates to prevent tunneling. Sprint Burst helps you survive unpredictable chases, and Adrenaline provides a strong endgame reset.
In SWF
Priority:
Prove Thyself
Adrenaline
Sprint Burst or Lithe
Borrowed Time
Why:
Communication removes the need for many information-based perks. Instead, value shifts toward specialization and efficiency. Prove Thyself becomes much stronger because coordinated generator work is more consistent. Borrowed Time gains reliability because teammates can coordinate rescues better. Exhaustion perks remain strong, but can be used more strategically rather than defensively.
For Beginners
Best starting direction:
Lithe
Kindred
Borrowed Time
Adrenaline
This setup is easier to understand and execute compared to chase-heavy builds that rely on strict timing. It reduces decision pressure and helps new players focus on positioning and basic survival.
For High MMR / Confident Loop Players
Advanced direction:
Dead Hard
Resilience
Decisive Strike
Adrenaline or Sprint Burst
This setup has a higher skill ceiling. It rewards precise timing, strong looping routes, and better chase discipline. When executed well, it offers significantly higher value, but mistakes are punished more heavily.
Core Idea
Solo queue builds prioritize information and self-protection.
SWF builds prioritize efficiency and coordinated pressure.
High-skill builds trade safety for maximum value potential.

Part 7: What Should Be Deprioritized When Building a Survivor Loadout
If you want to improve your build strength, it helps just as much to know what not to focus on as what to pick.
Avoid building from oversized “everything is good” lists
With a very large perk pool, not every option deserves equal attention. Many perks are situational, outdated in value, or only useful in very specific scenarios. Trying to treat all of them as equally strong leads to unfocused builds that do nothing consistently well.
Stronger loadouts usually come from clear roles, not from mixing too many unrelated effects.
Be careful with outdated “must-have” labels
Statements like “Rank 1 mandatory perk” or similar legacy opinions often lack current context. Balance changes, meta shifts, and gameplay evolution can significantly change perk value over time.
Older discussions can still be useful as reference points, but they should not be treated as universal rules without checking how they fit the current environment.
Don’t overvalue comfort perks
Comfort-based choices often feel safe, but safety is not always efficiency.
A common example is Self-Care: it provides independence, but in many situations it slows overall team tempo compared to alternatives like teammate healing or medkit usage.
Comfort is useful only when it does not significantly reduce your overall pressure contribution.
Avoid over-focusing on killer comparisons
Some players try to evaluate survivor perks by comparing them directly to killer mechanics or perks. This often leads to confusion, because the roles are fundamentally different.
Survivor builds should be judged by how they improve your survival, pressure contribution, and decision-making—not by how they mirror or counter specific killer perks in isolation.
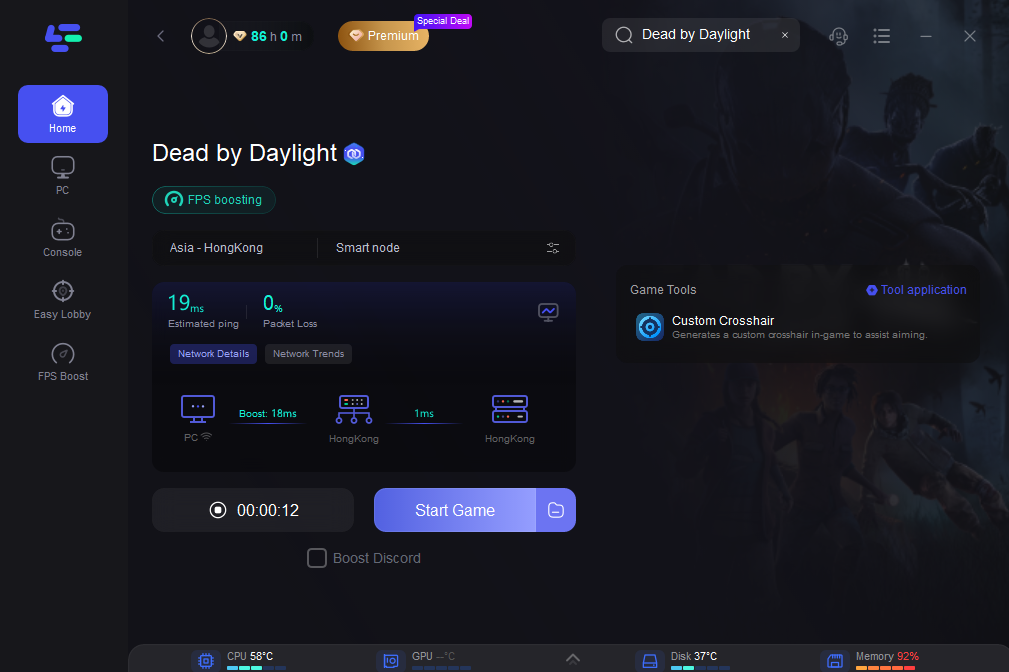
Part 8: Ensure Smooth Gaming in Dead by Daylight with LagoFast Game Booster
LagoFast is a game network optimization tool designed to improve connection stability for online games by optimizing routing between the player and game servers. It is mainly used in environments where matchmaking is stable, but network routing causes high ping, packet loss, or inconsistent latency.
How it works
LagoFast focuses on route optimization rather than hardware changes. Instead of modifying in-game settings, it adjusts how your data travels across networks.
Key functions include:
- Selecting more stable network paths to game servers
- Reducing unnecessary routing hops
- Avoiding congested ISP nodes
- Stabilizing packet transmission during peak hours
The goal is not to increase raw internet speed, but to make the connection more consistent and predictable during gameplay.
Download LagoFast and start your free trial.
Search for your game in the dashboard.
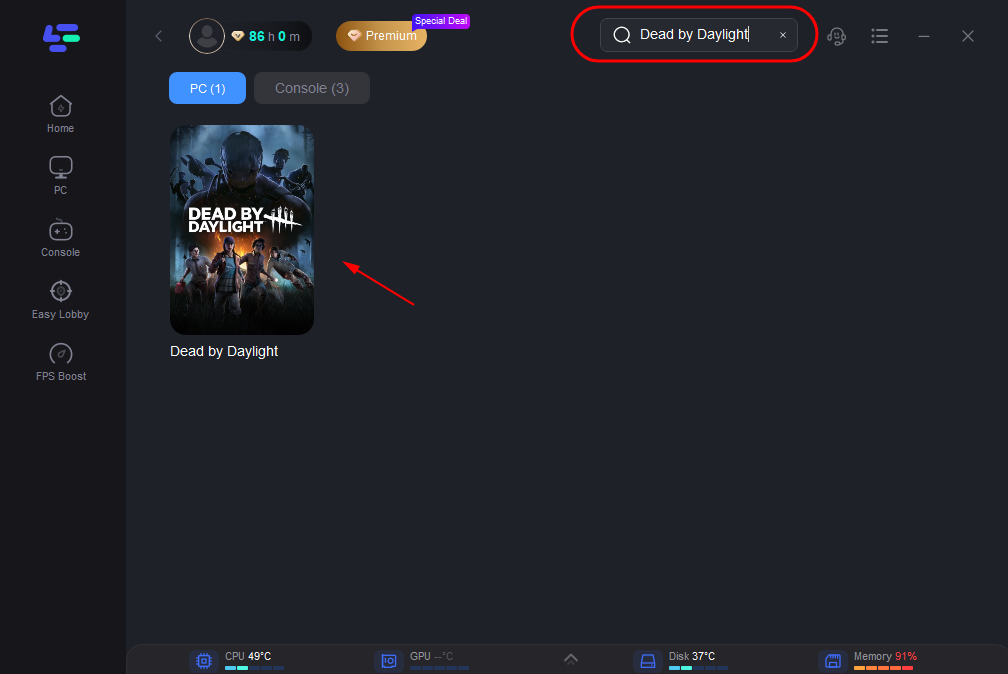
Select the most stable server and choose a nearby or unrestricted node.
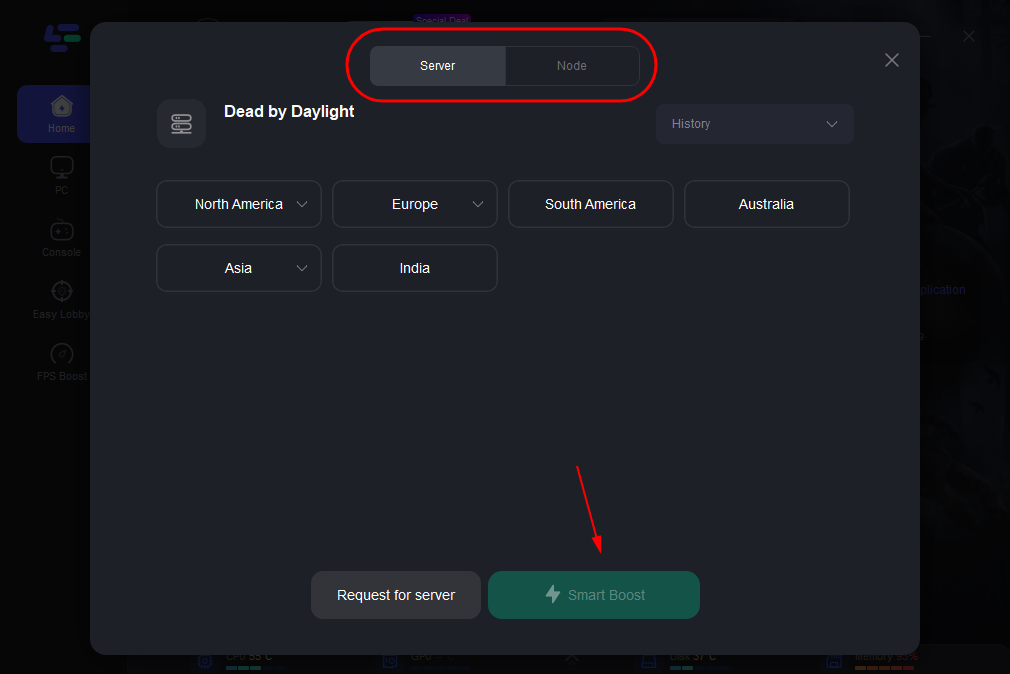
Click “Smart Boost” to activate real-time acceleration and monitor your ping, packet loss, and network route.
Part 9: FAQ
What are the best Survivor perks for solo queue in Dead by Daylight?
The most reliable solo queue perks are Kindred, Sprint Burst, Decisive Strike, and Adrenaline. This combination covers information awareness, chase safety, anti-tunneling protection, and endgame pressure.
Which Survivor perks should beginners unlock first?
Start with Sprint Burst or Lithe, then aim for Adrenaline, Kindred, and Borrowed Time. Meg is often recommended as a first priority because the community consistently values Sprint Burst and Adrenaline as strong free perks that fit into many builds.
Are Sprint Burst and Adrenaline still strong free perks?
Yes. They are still widely considered among the most reliable free survivor perks. Community discussions frequently highlight Meg’s Sprint Burst and Adrenaline as strong and versatile options that work across many different builds.
What is the best anti-tunneling Survivor build in DBD?
A strong anti-tunneling setup is Decisive Strike, Dead Hard, Borrowed Time, and Adrenaline. It provides post-unhook protection, chase extension, safer rescues, and a strong endgame reset.
Final summary
If you only want a short list, use this:
- Best overall meta perks: Adrenaline, Sprint Burst, Dead Hard, Decisive Strike
- Best utility perks: Borrowed Time, Kindred, Prove Thyself, Lithe, Resilience
- Best early unlocks for beginners: Meg first, then Feng Min if you want a simpler exhaustion perk
- Best solo queue core: Kindred, Sprint Burst, Decisive Strike, Adrenaline
- Best anti-tunneling core: Decisive Strike, Dead Hard, Borrowed Time
- Best endgame core: Adrenaline plus one exhaustion perk
The simplest way to build survivor loadouts in the current meta is to think in roles: one mobility perk, one safety perk, one team or information perk, and one endgame perk.

Boost Your Game with LagoFast for Epic Speed
Play harder, faster. LagoFast game booster eliminates stutter and lags on PC, mobile, or Mac—win every match!
Quickly Reduce Game Lag and Ping!
Boost FPS for Smoother Gameplay!